Automated tools are used to aid in the auditing, discovery, and exploitation of vulnerable web applications. In this lab, we will practice using some of the common tools that professionals use to aid in the process of discovering bugs in sites.
What you will do
You will use Google Cloud Platform's Compute Engine to deploy a number of vulnerable servers and docker containers. Then, using a Kali VM, you will point automated tools at these vulnerable services to identify specific issues with them. We must set up our own vulnerable infrastructure since many of these tools can not be used on external web applications without prior consent. It is important for these tasks to be confined to private, internal IP addresses on your cloud project.
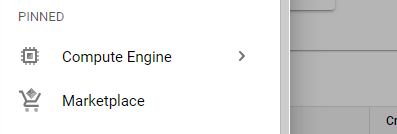
Begin by instantiating a VM using a Kali VM image. Log into your Google Cloud Platform account and go to your project's console. From the dropdown menu, scroll down to locate "Marketplace" and "Compute Engine" and pin them to the top for easy access:
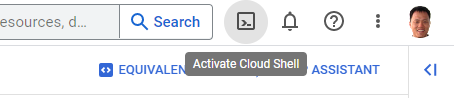
From the web console, launch Cloud Shell.
Then, run the command below to find the most recent version of the Kali VM image on the course's GCP project.
gcloud compute images list \
  --project pdx-cs --no-standard-images
Make a note of the name of the Kali VM image, then fill in the gcloud command below and launch a VM using the image. Attach the tags that will allow incoming HTTP and HTTPS traffic to the VM (needed for the metasploit lab)
gcloud compute instances create kali-vm \
--machine-type e2-micro --zone us-west1-b \
--image-project pdx-cs \
--image kali-rolling-latest
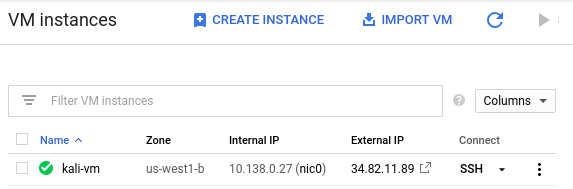
gcloud compute instances add-tags kali-vm --tags=http-server,https-serverKeep track of both the external and internal IP address of each instance. We will be using the internal IP address for the attacks, but will need to connect via the external IP addresses initially.
kali_external_IP, kali_internal_IP
ssh into your Kali VM instance to ensure you can access it.
Alternatively, you can perform the command below to do so as well.
gcloud compute ssh kali-vm --zone=us-west1-bWe will be performing reconnaissance tasks on a variety of servers with the VM created in the previous step. To do so, we'll use Google Marketplace to set our server deployments on Compute Engine VMs automatically. Marketplace solutions leverage GCP's "Deployment Manager" for launching instances. After launch, you can remove the deployments from the "Deployment Manager" in the console.
You will bring up the following deployments in Marketplace.
- https://console.cloud.google.com/marketplace/details/bitnami-launchpad/lampstack
- https://console.cloud.google.com/marketplace/details/bitnami-launchpad/nginxstack
Go to "Compute Engine" to find the External IP address of each VM that is running a server and visit the address in a web browser.
- Take screenshots of the top part of the landing page for each deployment
ssh into the nginx and lamp stack instances via the web console and install the lsof tool in each
sudo apt install lsofThe lsof command can list all of the open file descriptors (e.g. files, network connections, listening sockets) that are currently open on the system and the processes that have them open. It is a useful utility for seeing what is being run on the server. We are interested in processes that have a TCP port on the server open and in a "LISTEN" state. Web servers typically "LISTEN" on port 80 (*:http) to receive incoming connections from web browsers. On each VM, perform the following command to find the name of the command that has the web server port in a LISTEN state.
sudo lsof +c 10 -i | egrep "(LISTEN|COMMAND)"Each web server is launched with either a pointer to a configuration file or a configuration directory that specifies how the web server has been set up to serve content. Use the command name from the lsof listing and perform a process listing searching for that command name using ps to identify the location of the configuration file or directory the server is using.
sudo ps -ef | egrep <COMMAND_NAME>Investigate the configuration file of the web server. Identify the directory path that serves the default landing page for each server. For example, on Apache a ServerRoot or DocumentRoot directive might specify this path or on nginx, the "location /" path for the server might specify this path. Alternatively, one can perform a "find" command to locate files that might contain the landing page of each server. The command below will search the current directory (and all of its subdirectories) for files that begin with "index".
sudo find . -name "index*"After finding the root directory on each web server, change into the directory.
cd <path_to_document_root>Then, create directories named secret, files, admin
sudo mkdir secret files adminNext, create index.html files in each directory using the following bash command
for i in secret files admin
do
sudo bash -c "echo 'Hello $i' > $i/index.html"
done
Perform an ls -l on the web server files to determine the user and group ownership on the files being served. Then, change the ownership and group of the directories and files created to match. Note that, files must be readable and directories must be readable and executable by the web server in order for them to be served. Useful commands for recursively (-R) changing the user and group settings for each file in the current directory and for recursively setting files to be group/other readable along with directories to be group/other readable and executable are below:
sudo chown -R bitnami:bitnami .
sudo chmod -R go+rX .
Visit the "secret" directory in each of the VMs using a web browser pointed to the External IP address to ensure you've created the files and directories correctly.

Set-up a web server on a Windows Server VM on Google Compute Engine.
Option #1: Web console
Performing the QuickStart to create the server instance in the link below. Ensure that the server is brought up in the us-west1-b zone and has HTTP enabled.
When you attempt to connect to the VM instance, you may skip installation of the Chrome Remote Desktop service.
Option #2: Cloud Shell
Launch Cloud Shell from the web console. Then, create the Windows VM with the gcloud command below:
gcloud compute instances create windows-server \
  --zone=us-west1-b \
  --machine-type=e2-medium \
  --image-project windows-cloud --image-family windows-2019 \
  --tags=http-server
We'll need to reset the account credentials for our OdinId. Replace your OdinId in the reset password command below to obtain your Windows password.
gcloud compute reset-windows-password windows-server \
  --zone=us-west1-b --user=<OdinId>
Make a note of this password for use in connecting to your VM.
Connect to the VM (both options):
For tools for connecting to the VM, you will need to have a Microsoft Remote Desktop client on your machine. Clients are available on most platforms.
- On Windows, use the native "Remote Desktop Connection" client and enter the external IP address of the instance.
- On MacOS, download the Microsoft Remote Desktop client from the App Store
- On Linux machines, install
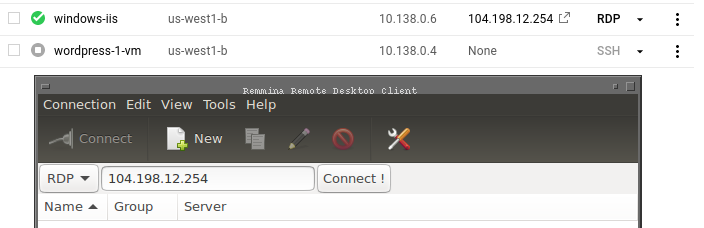
remminaorxfreerdp. Enter theexternal IPaddress of your Windows instance.
After successfully connecting to the Windows server, install a web server on it. (Instructions taken from this link). Click the Windows icon on the lower left, then navigate the programs until you locate the "Windows PowerShell" folder. Right-click the Windows PowerShell icon then click on "Run as administrator".

Within PowerShell, run the following commands to install IIS.
import-module servermanager

add-windowsfeature web-server -includeallsubfeature
Note that if the web server installation hangs, interrupt the command via Ctrl+c and try again.
Finally, use the following command to create a landing page on the web server in its root directory (C:\inetpub\wwwroot)
echo '<!doctype html><html><body><h1>Hello World!</h1></body></html>' > C:\inetpub\wwwroot\index.htmlPoint your web browser to the external IP address of the instance and ensure you see the server's landing page you've just created.
Setup web server files
Change into the webroot folder and then create directories named secret, files, and admin using individual mkdir commands.
cd C:\inetpub\wwwroot
mkdir admin
mkdir secret
mkdir files- Then, copy the
index.htmlfile you created initially into each of the directories
cp .\index.html admin
cp .\index.html secret
cp .\index.html files
- Create 3 directories of your own using words of your choice and copy the
index.htmlfile into them as well
Finally, we will be using the tools that we have set up on your course WFP VMs. Visit the Compute Engine console and start these VMs up.
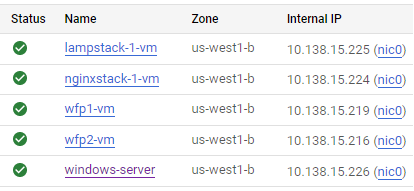
Note internal addresses of all VMs
It is important that your accesses in these labs use the Internal IP addresses of each server. Make a note of the Internal IP addresses of your VMs. We will be utilizing them in subsequent steps (e.g. wfp1_internal_IP, wfp2_internal_IP etc..)
- Take a screenshot and include in your notebook a listing of all VMs you have running and their
Internal IPaddresses.