In this week's exercises, your group will try out the various tasks for command and configuration generation using LLMs. Begin by completing the setup parts of the codelab. Then, attempt the exercise your group has been assigned in the following Google Slide presentation:
- Week 7 slides
Add screenshots that you can use to walkthrough how you performed the exercise. Your group will present your results for the exercise during the last hour of class. After completing the exercise you've been assigned, continue to the rest of the exercises in order to prepare for the week's homework assignment.
For this set of exercises, we'll be utilizing two vulnerable web servers from Web For Pentester. Writeups for exercises found on the two servers can be found here and here.
Cloud Shell
To begin with, navigate to the Google Cloud Platform console and bring up a Cloud Shell session. As the servers are highly vulnerable, we will first create a firewall rule to only allow traffic from Portland State University IP addresses.
gcloud compute firewall-rules create pdx-80 \
  --allow=tcp:80 --source-ranges="131.252.0.0/16" \
  --target-tags=pdx-80 --direction=INGRESS
Instantiate the VMs.
gcloud compute instances create wfp1-vm \
  --machine-type e2-micro --zone us-west1-b \
  --image-project famous-empire-181720 \
  --image wfp1-nofilter
gcloud compute instances create wfp2-vm \
--machine-type e2-small --zone us-west1-b \
--image-project famous-empire-181720 \
--image wfp2-nofilterMake a note of the two internal IP addresses (WFP1_Internal and WFP2_Internal). Both addresses should be of the format 10.x.y.z. Also make a note of the two external IP addresses (WFP1_External and WFP2_External). Finally, attach the firewall rule to each.
gcloud compute instances add-tags wfp1-vm --tags=pdx-80 --zone us-west1-b

gcloud compute instances add-tags wfp2-vm --tags=pdx-80 --zone us-west1-b
Then visit each of the external IP addresses from a web browser and ensure they return a page
http://WFP1_External
http://WFP2_External
We'll be utilizing an agent on the course VM to issue commands commonly used to perform penetration tests.
Course Linux VM
ssh into your virtual machine, add the Kali VM repositories to and install the packages we'll be using for the lab.
sudo sh -c "echo 'deb https://http.kali.org/kali kali-rolling main non-free contrib' > /etc/apt/sources.list.d/kali.list"
sudo wget https://archive.kali.org/archive-key.asc -O /etc/apt/trusted.gpg.d/kali-archive-keyring.asc
sudo sh -c "echo 'Package: *'>/etc/apt/preferences.d/kali.pref; echo 'Pin: release a=kali-rolling'>>/etc/apt/preferences.d/kali.pref; echo 'Pin-Priority: 50'>>/etc/apt/preferences.d/kali.pref"
sudo apt update -y
sudo apt install nmap hydra wfuzz sqlmap wordlists -y
sudo gunzip /usr/share/wordlists/rockyou.txt.gz
Change into the source directory containing the examples, create a virtual environment, activate it, and install the packages.
cd cs410g-src/07*
git pull
virtualenv -p python3 env
source env/bin/activate
pip install -r requirements.txt
Linux ships with a large library of commands that users invoke from the command line. While one typically memorizes the commands and its flags in order to learn how to use them, language models and generative AI can allow a user to focus on the function that is being asked rather than the syntax of a particular command. Consider the following agent code that is configured to execute commands in the terminal based on instructions given by the user. As done in prior LangChain agents, the prompt used consists of a base ReAct prompt that has been amended by a custom set of instructions that the user provides in the command line.
user_instructions = sys.argv[1]
tools = load_tools(["terminal"], llm=llm, allow_dangerous_tools=True)
base_prompt = hub.pull("langchain-ai/react-agent-template")
prompt = base_prompt.partial(instructions=user_instructions)
agent = create_react_agent(llm,tools,prompt)
agent_executor = AgentExecutor(agent=agent, tools=tools, verbose=True)
Run the agent asking it to execute specific commands associated with processes in Linux when prompted by the user.
python3 01_commands.py \
"Answer the user's request by running Linux commands ps, sudo, lsof, or ls via the Terminal tool."
Then, test the agent with prompts for performing process forensic analysis in order to evaluate the model's effectiveness.
- Using
sudo, find the names of all processes with open network connections usinglsof - Show the path of the executable file used to launch
sshd - Show all processes whose original binaries have been deleted
- Show the current working directory of the Python process
- Find the PID of the python processes, then use
/procto show its environment - Show all processes which have the current working directory of
/tmp - Show all scheduled tasks
When searching files for particular content in them, regular expressions are often used to express advanced string matching operations. As the language itself can be difficult to learn, one use for LLMs is to obviate the need for learning regular expression syntax. Linux's egrep (global regular expression print) command is often used in Linux to perform a regular expression search on an input. To demonstrate this, we'll be using the RockYou dataset of compromised passwords for this exercise.
Run the agent with instructions that ask it to utilize a set of tools for performing searches on the file via regular expressions.
python3 01_commands.py \
"Answer the user's request by running Linux commands egrep or wc on the password file at /usr/share/wordlists/rockyou.txt via the Terminal tool."
Then, query the agent to execute commands using Linux's egrep that searches words in the rockyou.txt file. Run each command multiple times to validate the regular expressions generated for correctness.
- How many passwords begin with the letter
a - How many passwords begin with the number 1
- How many passwords consist of only alphabetic characters
- How many passwords are made up of exactly 6 numbers
- List all passwords in
rockyou.txtthat beginabcdeand end with the number 9
Searching files in Linux via the command-line is often done with the find command and its many flags. While in the past, administrators would have to memorize the flags or read the man pages to craft the appropriate command, an LLM may obviate the need to do so now.
Run the agent with a prompt that asks it to utilize a set of tools that allow it to find particular files in the file system.
python3 01_commands.py \
"Answer the user's request by running Linux commands find and sudo via the Terminal tool."
Then, query the agent to execute commands using Linux's find that searches for particular files in the file system.
- Find all
setuidandsetgidprograms in/bin - Find all ELF executables in
/bin - Find all files modified in the last day in
/etc - Find all files created in the last day in
/etc - Find all ssh authorized_keys files in
/home - Find all history files in user directories that have size 0
Firewalls and filtering allow one to restrict traffic to and from a machine to reduce the attack surface of a machine as well as limit the impact that a compromise might have on the rest of the network. On Linux, iptables provides a mechanism for specifying rules that can be applied to traffic. For this exercise, because an incorrect command that is executed might cause us to lose connectivity to the VM, we'll only ask for the iptables commands to run.
Run the agent with a prompt that asks it to produce commands that allow it to implement a firewall policy the user requests.
python3 01_commands.py \
"Answer the user's prompt by specifying iptables commands that implement what is asked."
Then, query the agent to generate commands that implement a variety of rules using iptables.
- What command allows ssh traffic from 131.252.220.0/24?
- What command allows incoming connections to ports 80 and 443 from 131.252.0.0/16?
- What command allows outgoing connections to a MySQL database server at 10.0.0.10?
- What command denies all traffic from 1.1.1.1
It is helpful for Linux administrators to be able to examine the log files on a system to see what actions have occurred on them. Towards this end, we'll utilize an agent to compose a set of Linux commands for analyzing activity on a system from its audit logs.
Run the agent with a prompt that asks it to utilize a set of tools that allow it to extract information from audit logs on the system.
python3 01_commands.py \
"Answer the user's prompt by using sudo to run Linux commands who, last, lastb, lastlog, egrep, head, or tail via the Terminal tool."
Then, query the agent to execute commands using Linux commands that perform forensic queries below:
- Find all currently logged in users
- Find the last 5 successful logins
- Find the last 5 unsuccessful logins and the IP addresses they came from
- Find the last 5 logins from the root user
Data is often delivered from Web APIs via the Javascript Object Notation format or JSON. One tool that is helpful for quickly parsing JSON is jq. The syntax for the command has a learning curve that may be difficult for some to learn. In this exercise, we'll examine the ability for an LLM to properly analyze a JSON object and generate jq queries using natural language.
To begin with, install jq on your VM.
sudo apt install jq
Begin by visiting the Certificate Transparency site at https://crt.sh and lookup the domain kapow.cs.pdx.edu. Doing so will access the URL https://crt.sh/?q=kapow.cs.pdx.edu and the results will be returned as an HTML page. One can retrieve the same content, but in a JSON format. Within your VM, use the curl command below to download a JSON version of the results to a file.
curl "https://crt.sh/?q=kapow.cs.pdx.edu&output=json" > kapow.json
The JSON returned has a schema that you would need to parse and understand before being able to write a jq command to pull out specific information from it. Upload the JSON output or copy it to an LLM and prompt the LLM to generate a jq command that prints out the certificate ID and common name of every entry.
- Show the
jqcommand that the LLM outputs
Run the jq command on the JSON.
- Does the command return the correct results?
Now, ask the LLM to directly output the certificate ID and common name directly.
- Does it produce the same results?
Next, with the help of an LLM to produce all unique domain names that crt.sh reports for the domain cs.pdx.edu
- How many unique hosts have registered certificates within this subdomain?
nmap is a tool that can be used to find open and vulnerable services on a given machine. We can use our agent to analyze the WFP VMs. For these exercises, you will be pointing nmap to the internal IP address of the VM which has a prefix of 10.x.y.z.
Begin by running the agent, with a prompt asking it to utilize nmap to answer the user's requests.
python3 01_commands.py \
"You are a network mapping agent.  Use nmap with sudo in the terminal to answer the user prompt."
Then, ask a series of questions that require the agent to utilize nmap to query the WFP1 and WFP2 Internal IP addresses for:
- The services that are running on them
- The version of the operating system they are running
- The web server software that is running on them
nmap contains a scripting engine (NSE) for customizing how it performs scans on targets. A large library of pre-existing scripts written in Lua are included in its default distribution.
Scripts are classified under a variety of categories such as discovery, vuln, brute, malware and exploit. One can list all of the scripts for a particular category via:
nmap --script-help <category>
http-enum
One script that is useful is a brute-force directory scanner. If a web server has hidden directories that aren't referenced from any page, a brute-force scanner can be used to reveal them. Within the agent, see what directories are on the WFP1 web server using a prompt like the one below.
- Use
nmap's http-enum to find directories atWFP1_Internal
http-brute
Another script that is useful is a brute-force authentication one. The WFP2 web site has a simple HTTP Basic Authentication protected page at http://WFP2/authentication/example1. Within the agent, attempt a brute-force attack on the credentials for the page using a prompt like the one below.
- Use
nmap's http-brute script on the path /authentication/example1 for the web server atWFP2_Internal
sqlmap is a tool that automatically identifies applications with SQL injection vulnerabilities and attempts to dump the backend database of those applications. The two vulnerable VMs have a set of endpoints that are vulnerable.
Run the agent with a prompt asking it to use sqlmap to answer the user's request.
python3 01_commands.py \
"You are a sqlmap agent.  Use sqlmap in batch mode in the terminal to answer the user prompt."
Then, ask a series of questions that require the agent to utilize sqlmap on vulnerable URLs within the WFP VMs.
WFP1
Fill in the IP address for WFP1_Internal in the URL below then visit it.
http://WFP1_Internal/sqli/example1.php?name=root- Use
sqlmapin batch mode to get the passwords from the URL - What
sqlmapcommand is performed? - What steps did
sqlmaptake to access the passwords?
Fill in the IP address for WFP1_Internal in the URL below then visit it.
http://WFP1_Internal/sqli/example5.php?id=2- Use
sqlmapin batch mode to dump the database via the URL - What
sqlmapcommand is performed? - What steps did
sqlmaptake to access the passwords?
Fill in the IP address for WFP1_Internal in the URL below then visit it.
http://WFP1_Internal/sqli/example9.php?order=name- Use
sqlmapin batch mode to test the URL - What
sqlmapcommand is performed? - What steps did
sqlmaptake to access the passwords?
WFP2
Fill in the IP address for WFP2_Internal in the URL below then visit it.
http://WFP2_Internal/sqlinjection/example1/?username=f&password=f&submit=Submit- Use
sqlmapin batch mode to find the passwords in the database at the following URL - What
sqlmapcommand is performed? - What steps did
sqlmaptake to access the passwords? - Go back to the site and enter the username and password found. Did they work?
natas15
The natas Overthewire CTF has a Blind SQL injection level that sqlmap can automatically solved. Specifically, the following command will dump the entire database backend using a blind attack.
sqlmap -u 'http://natas15.natas.labs.overthewire.org' \
  --auth-type basic --auth-cred natas15:SdqIqBsFcz3yotlNYErZSZwblkm0lrvx \
  --data username=foo --dbms mysql --dump --level 2 \
--batch --time-sec 1- Using the agent, develop a prompt that will generate the command above that can be used to automatically dump the database.
- Note that if you execute the command, it will take around 10 minutes to dump the entire database.
commix stands for Command Injection Exploiter. Command line vulnerabilities occur when user input is sent to command line programs that don't validate the input. When you go to one of the ip addresses listed below, it will show the output of the ping command.
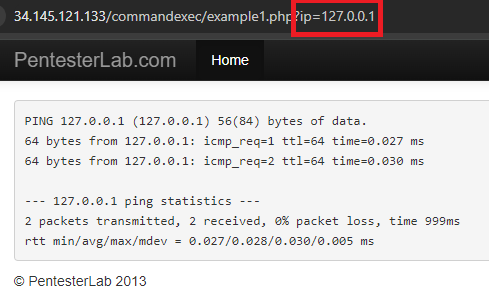
On the backend there is a command being run that takes the ip parameter and dynamically substitutes it into the ping command so you get ping 127.0.0.1. However, it is possible to enter in a Linux command separator like a semi-colon which will allow the user to enter more commands. Commix tries to find those vulnerabilities and exploit them, allowing for remote code execution.
Since Commix attempts to open an interactive shell to the target it is necessary to use an interactive python program to interact with the shell once it is created. The code for doing so is shown below.
def open_shell_with_command(command_string):
    # Start the command with pexpect
    command_string += """ --output-dir="./data" """
    proc = pexpect.spawn(command_string)

    # Start a separate thread to read the output from the process
    output_thread = threading.Thread(target=read_output, args=(proc,))
    output_thread.daemon = True
    output_thread.start()
The function uses the library pexpect (Python Expect), a tool that allows one to easily script interactive sessions programmatically as a process interacts with external sources. It does so by spawning a new process, then creating a daemon thread for the output. This makes it so that reading the output is non-blocking and so that when the process exits, the output thread will also be killed. The non-blocking thread is important because it allows the program to still interact with the shell when waiting/receiving output. The output thread is created to run the read_output function shown below:
def read_output(proc):
    try:
        while True:
            # Read and print all available output from the process
            output = proc.read_nonblocking(size=1024, timeout=60)
            if output:
                print(output.decode(), end='')
    except pexpect.EOF:
        pass
    except Exception as e:
        print(f"Error reading output: {e}")
The process spawned by pexpect (proc) has a function read_nonblocking, which the function is iterating over. It takes in chunks of 1024 bytes and will close after 60 seconds of inactivity.
Create the directory for commix to store its data in.
mkdir -p ~/Tools/commix
git clone https://github.com/commixproject/commix.git ~/Tools/commix
cd ~/Tools/commix
sudo python3 commix.py --install

sudo mkdir /usr/share/commix/data
sudo chmod -R 777 /usr/share/commix
Then, run the script to launch the agent with a prompt.
python 02_commix_wrap.py \
"You are an expert pentester. Please use commix in --batch mode to answer any questions"
Then, use the agent on the Command Execution exercises in the WFP1 VM.
Fill in the IP address for WFP1_Internal in the URL below then visit it.
http://WFP1_Internal/commandexec/example1.php?ip=127.0.0.1- Give the URL to the agent, then look at the command output for Commix.
- What was used to determine that the URL was vulnerable to command injection?
- Use whoami to find which user you are logged in as
Repeat the process for the next example. Fill in the IP address for WFP1_Internal in the URL below then visit it.
http://WFP1_Internal/commandexec/example2.php?ip=127.0.0.1- Give the URL to the agent, then look at the command output for Commix.
- What was used to determine that the URL was vulnerable to command injection?
- How does it differ from the prior URL?
One of the benefits of chatbots is that they can provide a more natural interface for search engines. Search engines such as Google come with a rich set of features that advanced users can leverage to zero find specific content. A summary can be found here. Examples include:
- Multi-word string search (e.g.
"We the people"to search for documents with this phrase) - Content restricted searches (
filetype:pdffor PDF files,ext:txtfor files with a txt filename extension) - Site restricted searches (
site:pdx.edufor documents on pdx.edu domains,@twitterfor content on social media platform Twitter) - Text restricted searches for URLs containing specific text (
inurl:security), pages with titles containing specific text (intitle:security), or pages with specific text (intext:disallow) - Negation operator (e.g.
-filetype:pdfremoves all results that are PDF files) - Logical operators (e.g.
(psychology | computer science) & designfor sites that match psychology design or computer science design)
Use an LLM to see if it can perform the same function as Google dork generators by having the LLM generate the dorks below.
Virtual desktop endpoints
"VNC Desktop" inurl:5800Restricted directories and paths
Search index restriction files (robots.txt/robot.txt) indicating sensitive directories that should be disallowed.
(inurl:"robot.txt" | inurl:"robots.txt" ) intext:disallow filetype:txtExposed database administration interface
inurl:phpmyadmin site:*.pdx.eduUnprotected database backups
SQL database backup files that have been left on a public web server
intitle:"index of" "database.sql.zip"Credentials
intitle:"index of" passwords" -FrontPage-" ext:pwd inurl:(service | authors | administrators | users)Secret files
"Not for Public Release" ext:pdfGoogle Cloud's Compute Engine service allows one to set up virtual machines configured with a variety of operating systems and network configurations. As we have done previously for the WFP1 VM at the beginning of this lab, this can be done via the command-line interface provided by the Google Cloud SDK and its gcloud command.
gcloud compute firewall-rules create pdx-80 \
  --allow=tcp:80 --source-ranges="131.252.0.0/16" \
  --target-tags=pdx-80 --direction=INGRESS

gcloud compute instances create wfp1-vm \
  --machine-type e2-micro --zone us-west1-b \
  --image-project famous-empire-181720 \
  --image wfp1-nofilter

gcloud compute instances add-tags wfp1-vm --tags=pdx-80 --zone us-west1-b- Use an LLM to explain each command
- Then, in a new session, generate a prompt that an LLM can be given that reproduces the commands. What LLM and prompt gets you the closest to implementing the above commands?
- Would you feel comfortable having an LLM deploy infrastructure based on a user prompt?
LLMs can be used to generate configuration files for services and infrastructure, potentially obviating the need to learn the syntax of a configuration language. Consider the nginx server block configuration for the web site http://mashimaro.cs.pdx.edu below. If properly prompted, an LLM can generate this configuration based if given the appropriate description.
server {
    server_name mashimaro.cs.pdx.edu;
    listen 80;
    root /var/www/html/mashimaro;
    index index.html;

    location / {
        try_files $uri $uri/ =404;
        autoindex off;
    }

    add_header Content-Security-Policy "default-src 'none'; script-src 'self'; connect-src 'self'; img-src 'self'; style-src 'self';" always;
}- Use an LLM to explain each line of the configuration
- Then, in a new session, generate a prompt that an LLM can be given that reproduces the configuration. What LLM and prompt gets you the closest to implementing the above configuration?
- Would you feel comfortable having an LLM configure infrastructure based on a user prompt?
LLMs can be used to generate configuration files for Infrastructure as Code systems such as Terraform. Consider the Terraform file below for a Google Cloud Platform deployment consisting of a static IP address and a Compute Engine instance that utilizes it. As part of the deployment, the IP address is output back to the user.
provider "google" {
  credentials = file("tf-lab.json")
  project     = "YOUR_PROJECT_ID"
  region      = "us-west1"
}

resource "google_compute_address" "static" {
  name = "ipv4-address"
}

resource "google_compute_instance" "default" {
  name         = "tf-lab-vm"
  machine_type = "e2-medium"
  zone         = "us-west1-b"

  boot_disk {
    initialize_params {
      image = "ubuntu-os-cloud/ubuntu-2204-jammy-v20240501"
    }
  }

  network_interface {
    network = "default"
    access_config {
      nat_ip = google_compute_address.static.address
    }
  }
}

output "ip" {
  value = google_compute_instance.default.network_interface.0.access_config.0.nat_ip
}- Use an LLM to explain each line of the configuration
- Then, in a new session, generate a prompt that an LLM can be given that reproduces the configuration. What LLM and prompt gets you the closest to implementing the above configuration?
- Would you feel comfortable having an LLM configure infrastructure based on a user prompt?
Another Infrastructure as Code approach is Kubernetes. With Kubernetes, one creates a logical specification of different services that run an application and the Kubernetes controller deploys it to a cluster of machines. Consider the Kubernetes file below for a web application deployment on Google Cloud Platform. The file specifies the container image to run, the number of replicas of the container image to run, and a load balancer to route requests to the replicas.
apiVersion: v1
kind: ReplicationController
metadata:
  name: guestbook-replicas
spec:
  replicas: 3
  template:
    metadata:
      labels:
        app: guestbook
        tier: frontend
    spec:
      containers:
      - name: guestbook-app
        image: gcr.io/YOUR_PROJECT_ID/gcp_gb
        env:
        - name: PROCESSES
          value: guestbook
        - name: PORT
          value: "8000"
        ports:
        - containerPort: 8000
---
apiVersion: v1
kind: Service
metadata:
  name: guestbook-lb
  labels:
    app: guestbook
    tier: frontend
spec:
  type: LoadBalancer
  ports:
  - port: 80
    targetPort: 8000
  selector:
    app: guestbook
tier: frontend- Use an LLM to explain each line of the configuration
- Then, in a new session, generate a prompt that an LLM can be given that reproduces the configuration. What LLM and prompt gets you the closest to implementing the above configuration?
- Would you feel comfortable having an LLM configure infrastructure based on a user prompt?