Using an LLM such as ChatGPT, Gemini , or Copilot to aid in summarizing code and reverse engineering its function can save a developer and an analyst a substantial amount of time and effort. However, to leverage this capability, one must be able to understand what tasks the models are reliably capable of doing to prevent errors. In this lab, you will utilize LLMs to analyze different code examples and determine whether the result is accurate. To begin with, change into the code directory for the exercises and install the packages.
cd cs475-src
git pull
cd 05*
virtualenv -p python3 env
source env/bin/activate
pip install -r requirements.txt
When summarizing code, we can programmatically parse the program based on the language it is written in before sending it to an LLM for analysis. Within the directory, there's a Python parsing program that uses the GenericLoader document loader and LanguageParser parser to implement a Python code summarizer.
def summarize(path):
    loader = GenericLoader.from_filesystem(
            path,
            glob="*",
            suffixes=[".py"],
            parser=LanguageParser(language="python"),
    )
    docs = loader.load()
    prompt1 = PromptTemplate.from_template("Summarize this Python code: {text}")

    chain = (
      {"text": RunnablePassthrough()}
      | prompt1
      | llm
      | StrOutputParser()
    )
    output = "\n".join([d.page_content for d in docs])
    result = chain.invoke(output)
src/p0.py
View the source file in the src directory to get an understanding of what it does.
- What does the code do?
Run the program in the repository below:
python3 01_code_summarize.py
Within the program's interactive shell, have the program summarize the file. Then, copy and paste the code into another LLM to get another summary of the code.
- How do the summaries differ in their accuracy?
Understanding unknown code is a task one might give an LLM, especially if the amount of code fits within the context window of a model. For example, one might use an LLM to determine whether or not code that has been downloaded from the Internet is malicious or not. Such an approach might be used to detect and prevent execution of malware that hijacks resources on a computer system, performs ransomware, or sets up a backdoor.
src/p1.py
Examine the code for the program.
- What does the code do?
Then, use the prior program and another LLM to summarize the code.
- How do the summaries differ in their accuracy?
src/p2.py
Examine the code for the program.
- What does the code do?
Then, use the prior program and another LLM to summarize the code.
- How do the summaries differ in their accuracy?
src/p3.py
Examine the code for the program.
- What does the code do?
Then, use the prior program and another LLM to summarize the code.
- How do the summaries differ in their accuracy?
src/p4.py
Examine the code for the program.
- What does the code do?
Then, use the prior program and another LLM to summarize the code.
- How do the summaries differ in their accuracy?
src/p5.py
Examine the code for the program taken from an article on malware analysis of Python packages. Its original source can be found here.
- What does the code do?
Then, use the prior program to summarize the code.
- How does the summary differ from the LLM in the article?
src/p6.py
Another example from the article is also included. Its original source can be found here.
- What does the code do?
Then, use the prior program to summarize the code.
- How does the summary differ from the LLM in the article?
Classifying unknown code is a task one might give an LLM as well. Similar to the prior exercise, we can configure a prompt to have an LLM analyze whether or not code performs specific operations that might be indicative of malware such as:
- Data exfiltration
- File creation
- Process launching
- Environment variable access
We can slightly modify our prior code to ask an LLM to evaluate whether a particular program performs each operation. This is done via a prompt shown below:
You are an advanced security analyst. Your task is to perform a behavioral analysis looking for specific behaviors such as:
  - **Data exfiltration**: Detect if data is sent off-machine or communicates with external IPs or servers.
  - **File creation**: Identify instances where files are created, deleted, or modified in the file system.
  - **Process launching**: Detect if new processes are launched or system commands are executed.
  - **Environment variable access**: Determine if environment variables are read or modified.
LLMs are good at returning output that matches a given format. For this exercise, we can specify the results be returned in JSON via the prompt as well:
For each behavior detected, provide supporting evidence and assign a confidence score (0 to 1).

Respond in JSON format with the following structure:
  {{
    "behavior_analysis": [
        {{ "data_exfiltration": {{ "detected": true/false, "confidence": 0-1, "evidence": "description of findings", "code_snippet": "snippet of code" }} }},
        {{ "file_creation": {{ "detected": true/false, "confidence": 0-1, "evidence": "description of findings", "code_snippet": "snippet of code" }} }},
        ...
  }}
src/p0.py
View the source file in the src directory to get an understanding of what it does.
- What does the code do?
Run the program in the repository below:
python3 02_code_classify.py
Within the program's interactive shell, have the program classify the file. Then, copy and paste the prompt and code into another LLM to get another classification of the code.
- How do the classifications differ?
src/p1.py
Examine the code for the program.
- What does the code do?
Then, use the prior program and another LLM to classify the code.
- How do the classifications differ?
src/p2.py
Examine the code for the program.
- What does the code do?
Then, use the prior program and another LLM to classify the code.
- How do the classifications differ?
src/p3.py
Examine the code for the program.
- What does the code do?
Then, use the prior program and another LLM to classify the code.
- How do the classifications differ?
src/p4.py
Examine the code for the program.
- What does the code do?
Then, use the prior program and another LLM to classify the code.
- How do the classifications differ?
src/p5.py
Examine the code for the program taken from an article on malware analysis of Python packages. Its original source can be found here.
- What does the code do?
Then, use the prior program and another LLM to classify the code.
- Does the classification differ from that generated by the LLM in the article?
src/p6.py
Another example from the article is also included. Its original source can be found here.
- What does the code do?
Then, use the prior program and another LLM to classify the code.
- Does the classification differ from that generated by the LLM in the article?
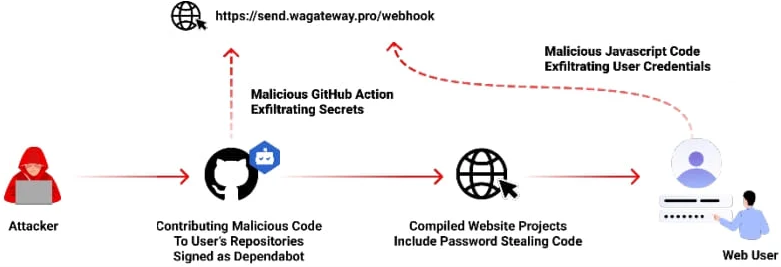
Open-source repositories managed via git are often targets for malicious software developers. Adversaries can publish malicious repositories, submit malicious commits, or initiate malicious pull requests. Automatically monitoring and reporting on potential threats and vulnerabilities in a repository can be useful with several services such as GitHub's Dependabot and Snyk's code analysis offerings providing real-time notifications on potential issues in a codebase. However, adversaries have been known to flood repositories with malicious pull requests that masquerade as legitimate services such as Dependabot attempting to patch vulnerable code in order to trick a maintainer into installing an info stealer shown below.
With repository maintainers receiving many pull requests from other developers wishing to add functionality or fix bugs in the codebase, it is important to verify that the requests are legitimate. Understanding unknown code is a task one might give an LLM, especially as a first pass, to reduce the load on the repository maintainer. In this exercise, we will combine an LLM's code analysis and summarization abilities with Python support for navigating GitHub repositories.
File analysis
Retrieving a file from a repository and examining its commits allows one to identify problematic code and track how it entered the source tree. Consider the code below that utilizes PyGithub to retrieve the contents of a file in a repository given its path, to identify the last commit that modified the file, and to obtain the changes made as a result of that commit.
import os
import github
github_token = os.getenv("GITHUB_PERSONAL_ACCESS_TOKEN")
g = github.Github(github_token)
repo = g.get_repo("user/repository_name")

file_path = "path/to/file"
file_content = repo.get_contents(file_path).decoded_content.decode("utf-8")
commits = repo.get_commits(path=file_path)
commit = commits[0]
commit_data = f"- Commit SHA: {commit.sha}\n  Author: {commit.commit.author.name}\n  Date: {commit.commit.author.date}\n  Message: {commit.commit.message}\n"

full_commit = repo.get_commit(commit.sha)
for file in full_commit.files:
    if file.filename == file_path:
        full_commit_data = f" - File: {file.filename}\n - Changes: {file.changes}\n - Additions: {file.additions}\n - Deletions: {file.deletions}\n - Diff: \n{file.patch}"
prompt = PromptTemplate(
input_variables=["file_path", "file_content", "commit_data", "full_commit_data"],
template="""You are a git file analyzer. The code to the file and information on its last commit is given. 1. Explain what the file does. 2. Summarize what happened in the last commit for the file.
File name: {file_path}\n\n
File contents: {file_content}\n\n
Last commit: {commit_data} \n\n
Last commit modifications: {full_commit_data}\n\n
Answer: """
)
chain = prompt | llm
summary = chain.invoke({
'file_path': file_path,
'file_content': file_content,
'commit_data': commit_data,
'full_commit_data': full_commit_data
})
print(summary)Can you tell me about 05_CodeSummarize/src/p5.py?
Is pull request 22 malicious?
Is this commit malicious? b9d9171679f13b588e2fd0a0200c1961fb74d438
Commit analysis
Retrieving a file from a repository and examining its commits allows one to identify problematic code and track how it entered th
Pull request analysis
Retrieving a file from a repository and examining its commits allows one to identify problematic code and track how it entered th
Reverse engineering binary code is often done when dealing with malicious code. Many automated tools have been created for reverse-engineering and are often built using heuristics gleaned from analyzing a large corpora of binary payloads manually. Large-language models perform a similar function and could potentially be used to help reverse-engineer difficult payloads automatically. Below is the assembly version of a CTF level for binary reverse engineering. It asks for a password string from the user, then prints "Good Job." if it is correct.
- Ask an LLM what this assembly does.
- Ask an LLM for the user input that would cause this program to print "Good Job."
Ch04x86_AsciiStrcmp.s
        .file   "program.c"
        .text
        .section        .rodata
.LC0:
        .string "Enter the password: "
.LC1:
        .string "%10s"
.LC2:
        .string "ViZjc4YTE"
.LC3:
        .string "Try again."
.LC4:
        .string "Good Job."
        .text
        .globl  main
        .type   main, @function
main:
.LFB0:
        leal    4(%esp), %ecx
        andl    $-16, %esp
        pushl   -4(%ecx)
        pushl   %ebp
        movl    %esp, %ebp
        pushl   %ecx
        subl    $20, %esp
        movl    $0, -12(%ebp)
        subl    $12, %esp
        pushl   $.LC0
        call    printf
        addl    $16, %esp
        subl    $8, %esp
        leal    -24(%ebp), %eax
        pushl   %eax
        pushl   $.LC1
        call    __isoc99_scanf
        addl    $16, %esp
        movb    $77, -13(%ebp)
        movzbl  -24(%ebp), %eax
        cmpb    %al, -13(%ebp)
        je      .L2
        movl    $1, -12(%ebp)
.L2:
        leal    -24(%ebp), %eax
        addl    $1, %eax
        subl    $8, %esp
        pushl   $.LC2
        pushl   %eax
        call    strcmp
        addl    $16, %esp
        testl   %eax, %eax
        je      .L3
        movl    $1, -12(%ebp)
.L3:
        cmpl    $0, -12(%ebp)
        je      .L4
        subl    $12, %esp
        pushl   $.LC3
        call    puts
        addl    $16, %esp
        jmp     .L5
.L4:
        subl    $12, %esp
        pushl   $.LC4
        call    puts
        addl    $16, %esp
.L5:
        movl    $0, %eax
        movl    -4(%ebp), %ecx
        leave
        leal    -4(%ecx), %esp
        ret
.LFE0:
        .size   main, .-main
        .ident  "GCC: (Ubuntu 9.4.0-1ubuntu1~20.04.2) 9.4.0"
        .section        .note.GNU-stack,"",@progbits
The source code of the level is shown below.
- Based on your analysis, was the LLM correct in the previous step?
Ch04x86_AsciiStrcmp.c
#include <string.h>
#define USERDEF0 'M'
#define USERDEF1 "ViZjc4YTE"
int main()
{
    char c0;
    int flag=0;
    char user_input[11];

    printf("Enter the password: ");
    scanf("%10s",user_input);

    c0=USERDEF0;
    if (user_input[0] != c0) flag=1;

    if (strcmp(user_input+1,USERDEF1)) flag=1;

    if (flag)
        printf ("Try again.\n");
    else
        printf("Good Job.\n");
    return 0;
}
Given the source code of the program, ask an LLM to explain it and find the input that causes the program to print "Good Job."
- Is it able to give a correct answer?
- How might you help a large language model successfully reverse engineer this level?
LLMs are great at summarizing sequential text, but most LLMs have not been trained on binary program data. To address this limitation, we can convert binary program data into a more concise and interpretable format before asking an LLM to perform the task. In this exercise, we'll leverage an external reverse engineering tool called Ghidra that is purpose-built to decompile binary program files. The output of this tool can then be used to perform an analysis. This pattern of utilizing purpose-built tools by an LLM agent rather than having the LLM perform, not only makes the task more accurate, it can also save substantial computational costs.
Setup
Begin by installing the necessary dependencies:
sudo apt update -y
sudo apt upgrade -y
sudo apt install openjdk-17-jre openjdk-17-jdk -y

cd $HOME

wget https://github.com/NationalSecurityAgency/ghidra/releases/download/Ghidra_11.0.3_build/ghidra_11.0.3_PUBLIC_20240410.zip
unzip ghidra_11.0.3_PUBLIC_20240410.zip
mv ghidra_11.0.3_PUBLIC ghidra
echo 'export PATH=$PATH:$HOME/ghidra/support' >> ~/.bashrc
source ~/.bashrc
Now that Ghidra is installed and the support folder is in the path, we can use the headless script in the folder to summarize binary files.The Python program in the repository calls analyzeHeadless with the -postScript tag to analyze the binary file.
command = [
    "analyzeHeadless",
    project_dir,
    project_name,
    "-import",
    binary_path,
    "-postScript",
    script_path
]

# Execute the command
result = subprocess.run(command, text=True, capture_output=True)
Then, a utility program (src/ghidra_example/jython_getMain.py) invokes Ghidra's decompiler to produce a function-level decompilation into C code. The program first creates a decompiler interface and then initializes the decompiler with the program argument. The monitor is used to monitor the progress made during the analysis.
decompiler = DecompInterface()
decompiler.openProgram(program)
monitor = ConsoleTaskMonitor()
The function manager manages all of the functions that are detected in the binary. The getFunctions(True) line will return an iterator over all of the functions detected in the binary.
function_manager = program.getFunctionManager()
functions = function_manager.getFunctions(True)  # True to iterate forward
Then the program iterates over the returned functions, looking for functions that start with "main". When functions that start with "main" are found it will try to decompile the function and if that succeeds it will print the C code of the function
results = decompiler.decompileFunction(function, 0, monitor)
if results.decompileCompleted():
    print("Decompiled_Main: \n{}".format(results.getDecompiledFunction().getC()))
else:
    print("Failed to decompile {}".format(function.getName()))
The output of this step can then be fed back to our original program for analysis.
Run the program:
python3 03_ghidra.py
- How does the decompiled function compare to the AsciiStrCmp function found in Exercise #9?
Run the binary file and enter the flag:
./src/ghidra_example/asciiStrCmp
- Is the flag correct?
Similar to Ghidra, the radare2 suite of reverse engineering tools can also be used to augment the reverse engineering process in order to aid the LLM in its analysis. Consider the code below that utilizes r2's scripting support r2pipe to open up an executable in r2 and execute a simple decompilation process on it. Upon returning the result of decompilation, the tool then sends the results to the LLM to analyze.
prompt1 = PromptTemplate.from_template("""You are an expert reverse engineer, tasked with sifting finding the flag by analyzing the code that is provided.

    Here is the code:
    {code}

    Find the flag!
    """)

# Open the binary using r2pipe
r2 = r2pipe.open(program)

# Perform initial analysis with radare2
# Do not show output of these two commands
_ = r2.cmd("aaa")  # Analyze all functions and references
_ = r2.cmd("s main")  # Seek to the main function, if exists

# Attempt to decompile the main function
output = r2.cmd("pdd")

# Send output to chain
chain = (
      {'code':RunnablePassthrough()}
      | prompt1
      | llm
      | StrOutputParser()
)

llm_result = chain.invoke(output)
Run the program:
python3 04_radare2.py
- What does radare2 provide to the LLM?
- Does it provide a guess for the password?
Run the binary file and enter the flag:
./src/ghidra_example/asciiStrCmp
- Is the flag correct?
While LLMs can understand the execution of simple programs, they are typically not optimized to perform a large scale run-time analysis of a piece of code. Riza is a service that provides an isolated WASM-based runtime environment for executing untrusted code. By allowing one to run dangerous code in a safe environment, Riza enables the analysis of unknown code in a low-risk manner. Using Riza's Code Interpreter API, we can give Riza code and have it return us the results of its execution in Riza's sandbox.
To begin with, visit the Riza site and create an account using your @pdx.edu address. Within your account dropdown, create an API key.
Then, set an environment variable using the value of the API key.
export RIZA_API_KEY="<FMI>"
Note that you can add this to your .bashrc file to automatically set the key when you login each time.
Agent code
We can utilize LangChain's support for Riza to allow an agent to execute code within a Riza sandbox in order to analyze it. Consider the code below that configures a simple tool-calling agent with Riza's support for executing Python and Javascript code. We'll utilize the agent to show how Riza can be utilized to execute obfuscated code.
from langchain.agents import AgentExecutor, create_tool_calling_agent
from langchain_community.agent_toolkits.load_tools import load_tools
from langchain_community.tools.riza import command
from langchain_core.prompts import ChatPromptTemplate

prompt = ChatPromptTemplate.from_messages(
    [
        ("system", "You are an expert at reverse engineering malware.  Use the tools you are given to execute the given code."),
        ("human", "{input}"),
        ("placeholder", "{agent_scratchpad}"),
    ]
)
tools = load_tools([])
tools.extend([command.ExecPython(), command.ExecJavaScript()])
agent = create_tool_calling_agent(model, tools, prompt)
agent_executor = AgentExecutor(agent=agent, tools=tools, verbose=True)
Run the program:
python3 05_riza.py
Give the obfuscated Python snippet below to the agent.
exec(''.join(map(chr,[112, 114, 105, 110, 116, 40, 52, 32, 42, 32, 115, 117, 109, 40, 40, 45, 49, 41, 42, 42, 105, 32, 47, 32, 40, 50, 42, 105, 32, 43, 32, 49, 41, 32, 102, 111, 114, 32, 105, 32, 105, 110, 32, 114, 97, 110, 103, 101, 40, 49, 48, 48, 48, 48, 41, 41, 41])))- What does the code do?
Next, give the obfuscated Javascript snippet below to the agent.
(function(){eval(String.fromCharCode(...[99, 111, 110, 115, 111, 108, 101, 46, 108, 111, 103, 40, 91, 46, 46, 46, 65, 114, 114, 97, 121, 40, 49, 48, 41, 46, 107, 101, 121, 115, 40, 41, 93, 46, 114, 101, 100, 117, 99, 101, 40, 40, 101, 44, 32, 110, 41, 32, 61, 62, 32, 101, 32, 43, 32, 49, 32, 47, 32, 40, 110, 32, 60, 32, 50, 32, 63, 32, 49, 32, 58, 32, 91, 46, 46, 46, 65, 114, 114, 97, 121, 40, 110, 41, 93, 46, 109, 97, 112, 40, 40, 95, 44, 32, 105, 41, 32, 61, 62, 32, 105, 32, 43, 32, 49, 41, 46, 114, 101, 100, 117, 99, 101, 40, 40, 97, 44, 32, 98, 41, 32, 61, 62, 32, 97, 32, 42, 32, 98, 41, 41, 44, 32, 48, 41, 41, 59]))})();- What does the code do?
Setup a Snyk account at https://snyk.io using your @pdx.edu address. Then, in your account settings, create an Auth Token as shown below.

Then, set an environment variable using the value of the token.
export SNYK_TOKEN="<FMI>"
Note that you can add this to your .bashrc file to automatically set the key when you login each time.