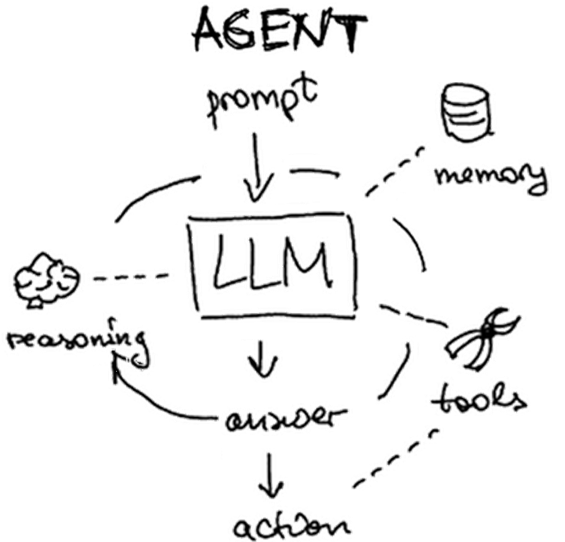
Another common application for LLMs is to construct autonomous agents. Based on a user's query, such agents are able to operate in a loop in which they produce their own plans, execute them, and view the results of execution. When they have sufficient information to answer a particular query, they return it to the user and terminate. Agents are typically configured with a set of tools that they can use to perform the execution.
Setup
Within the repository on the course VM, change into the exercise directory and update the code.
cd cs430-src/09*
git pull

One set of tools that can be provided to an LLM to execute is the OpenAPI toolkit (OpenAPIToolkit). Many web applications now utilize backend REST APIs to handle client requests. To automatically produce code that interacts with such APIs, the OpenAPI standard allows an API developer to publish a specification of their API interface which allows this to happen. Consider a snippet of the OpenAPI specification for the xkcd comic strip below. It contains the URL of the server hosting the APIs as well as endpoint paths for handling 2 API requests: one to fetch the current comic and one to fetch a specific comic given its comicId.
openapi: 3.0.0
info:
  description: Webcomic of romance, sarcasm, math, and language.
  title: XKCD
  version: 1.0.0
externalDocs:
  url: https://xkcd.com/json.html
paths:
  /info.0.json:
    get:
      description: |
        Fetch current comic and metadata.
  . . .
 "/{comicId}/info.0.json":
    get:
      description: |
        Fetch comics and metadata  by comic id.
      parameters:
        - in: path
          name: comicId
          required: true
          schema:
            type: number
   . . .
servers:
  - url: http://xkcd.com/
We can utilize the OpenAPIToolkit to access API endpoints given their OpenAPI specification. The code below instantiates the OpenAPI toolkit and agent creation function as well as utilities for loading OpenAPI YAML specifications. As OpenAPI endpoints must often be accessed with credentials, a RequestsWrapper must also be supplied that may contain Authorization: header settings for the calls. In our case, the xkcd API does not require authentication.
from langchain_community.agent_toolkits import OpenAPIToolkit, create_openapi_agent
from langchain_community.agent_toolkits.openapi.spec import reduce_openapi_spec
from langchain_community.agent_toolkits.openapi import planner
from langchain_community.utilities.requests import RequestsWrapper
import yaml
The program retrieves the specification from an open repository, loads it using a YAML parser, then creates a reduced version of the specification.
openapi_spec = requests.get("https://raw.githubusercontent.com/APIs-guru/unofficial_openapi_specs/master/xkcd.com/1.0.0/openapi.yaml").text
raw_api_spec = yaml.load(openapi_spec, Loader=yaml.Loader)
api_spec = reduce_openapi_spec(raw_api_spec)
It then instantiates the agent using the specification, the model, and the wrapper. Note that because the toolkit is able to make arbitrary API requests, it is dangerous to use and one must explicitly allow them.
xkcd_agent = planner.create_openapi_agent(
    api_spec=api_spec,
    llm=llm,
    requests_wrapper=RequestsWrapper(),
    allow_dangerous_requests=True,
)
The toolkit automatically creates tools for performing API requests. One can examine the tools using the code below. They will include a planner tool to create a sequence of API calls to answer a user query based on the API specification and a controller tool for executing the calls. We can examine them via the code below:
for tool in xkcd_agent.tools:
  print(f'  Tool: {tool.name} = {tool.description}')
Finally, the program provides an interactive shell for querying the xkcd API. Create a virtual environment, activate it, and install its packages.
virtualenv -p python3 env
source env/bin/activate
pip install -r requirements.txt
Then, run the program.
python 01_openapi_agent.py
Ask the questions below to test the agent and its tools.
Take a screenshot showing the results of execution
- What is the current xkcd?
- What is the image link of the current xkcd?
- What was xkcd 327 about?
Prior labs show examples where agents leverage built-in tools or custom-built tools provided by the application writer. As shown below, each LLM application would then execute its own code for accessing services.
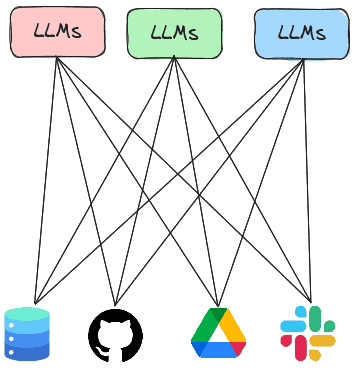
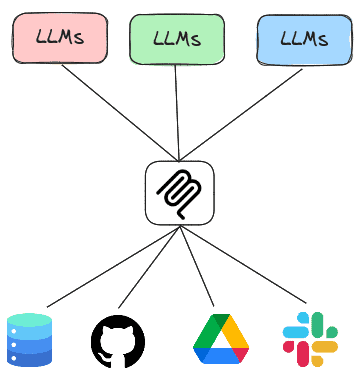
The Model Context Protocol or MCP is a standard protocol for LLMs to retrieve invoke both local and remote tools to access services. Thus, rather than having every LLM agent implement all of the tools it needs to execute, the agent can instead invoke tools implemented by MCP servers that are running either locally or remotely. In this lab, you will experiment with agents that utilize MCP servers to handle tasks.
Change into the exercise directory.
cd 02_sqlite
There are two main ways of running an MCP server. One way is to run the MCP server locally and communicate with it over standard input/output (STDIO) while another is to run the MCP server remotely and communicate with it over HTTP. For this lab, we'll support both modes and utilize a command-line argument that is passed when invoked to select the mode.
MCP server
The code below implements the SQLite server. It utilizes the FastMCP package to create the server and instantiates one tool within it called query(). The tool handles queries to a local SQLite database by taking a query string and executing it against a specified database, returning the results. By taking a raw query string, the tool is vulnerable to SQL injection attacks. Note that the description of the tool is provided within the comments of the tool declaration. This description is utilized by the server to instruct clients on how to access the tool. An LLM agent is better equipped to call MCP tools if these descriptions are detailed, specific, and accurate.
vulnerable_sqlite_mcp_server.py
from fastmcp import FastMCP
import sqlite3

mcp = FastMCP("sqlite")

@mcp.tool()
def query(query: str) -> str:
    """Query a Sqlite3 database. Returns the result of the query."""
    database = "./db_data/metactf_users.db"
    con = sqlite3.connect(database)
    cur = con.cursor()
    results = cur.execute(query)
    con.commit()
    output_string = '\n'.join([', '.join(map(str, row)) for row in results])
    return output_string

if __name__ == "__main__":
    if sys.argv[1] == 'stdio':
        mcp.run(transport="stdio")
    else:
        mcp.run(transport="http", host="0.0.0.0", port=8080)
MCP client
To leverage the tool that the server now supports, we can adapt our prior agent code to be an MCP client, leveraging LangChain's MCP adapter support to invoke the tool on the server. As the code shows, we first define the server we wish to bring up. In this instance, the path in the repository to the prior server code is specified. Then, in the agent loop, we create a connection to the MCP server and load the MCP server's tool into our agent, before querying it. In doing so, the agent will package an MCP call over STDIO via the session's connection and retrieve the results.
from langchain_mcp_adapters.tools import load_mcp_tools
from mcp import ClientSession
from mcp.client.stdio import StdioServerParameters, stdio_client
import asyncio

server = StdioServerParameters(
    command="python",
    args=["vulnerable_sqlite_mcp_server.py","stdio"]
)

prompt = f"You are a Sqlite3 database look up tool. Perform queries on a database hosted by the specified MCP server given the user's input.  Utilize the user input verbatim when sending the query to the database and print the query that was sent to the database"

async def run_agent():
    async with stdio_client(server) as (read, write):
        async with ClientSession(read, write) as session:
            await session.initialize()

            tools = await load_mcp_tools(session)
            agent = create_react_agent(model=llm, tools=tools, prompt=prompt)
            query = "Who are the users in the database?"
            result = await agent.ainvoke({"messages": [("user", query)]})
            print(f"Agent response: {result}")

if __name__ == "__main__":
    result = asyncio.run(run_agent())
Create a virtual environment, activate it, and then install the packages required.
virtualenv -p python3 env
source env/bin/activate
pip install -r requirements.txt
Then, run the program
python 01_stdio_mcp_client.py
As in the prior labs, attempt to interact with the database using the agent.
- List all tables
- How many users are in this database?
- List all usernames that begin with the letter 'a'
- Find the admin user in the database and output the password hash.
- What password hash algorithm and number of iterations are being used to store hashes?
- Find the user table and identify the columns that contain a username and password hash. Then, find the password hash for the admin user. Then, find the type of password hash it is. Finally, write a hashcat command to perform a dictionary search on the password.
It is quite dangerous to expose an MCP server like this without proper access control. Using the agent, show whether the server is vulnerable to attack using the queries below.
- List the passhash of
foo or 1=1-- - Drop the users table
Note, if the agent is able to delete the table, restore it from the command line via:
git checkout db_data/metactf_users.db
One can also run an MCP server remotely over the network, thus allowing MCP clients to invoke the tools that the server implements over the network using HTTP. In this step, we'll first deploy the SQLite MCP server as a serverless container running on Google's Cloud Run, then configure our client agent to invoke it using HTTP.
MCP server
Visit the course repository on GitHub and navigate to the directory containing the SQLite MCP code. Examine the Dockerfile in the directory. The Dockerfile specifies a container image that implements our MCP server. The container installs the Python packages required to run the server, then copies the server code and database file over, before running the server. Note that the container exposes only port 8080. By default, CloudRun routes all incoming requests to port 80 and 443 to port 8080 when a container is deployed unless specifically requested to do otherwise.
Click on the "Run on Google Cloud" button.

This will build the container from the Dockerfile in the repository and then deploy it onto Cloud Run, Google's serverless container platform. To do so, you'll need to.
- Authorize access to Cloud Shell when prompted
- Confirm that you trust the repository to allow it to be opened within Cloud Shell
- Select your course's Google Cloud Platform project to deploy the container onto
- Then select the region you want to deploy the container in (e.g.
us-central1)
The container will then be built and pushed to Google's Artifact Registry and then deployed onto Cloud Run. When deployed, a URL will be returned. Make a note of it.

Visit the Cloud Run interface via the web console.
- Take a screenshot of the deployed service that includes your OdinID

Course VM
MCP client
We'll now run the MCP client on the course VM and allow it to utilize the MCP server running in Cloud Run. To begin with, on the course VM, set the MCP_URL environment variable to the URL that is returned by Cloud Run.
export MCP_URL="https:// ...a.run.app"
To adapt the MCP client to utilize the remote MCP server, we simply tweak the client to utilize the Streamable HTTP interface to the MCP server's endpoint URL as shown in the snippet below, keeping the rest of the client the same.
async def run_agent():
        async with streamablehttp_client(f"{os.getenv('MCP_URL')}/mcp/") as (read, write, _):
        async with ClientSession(read, write) as session:
            await session.initialize()

            tools = await load_mcp_tools(session)
...
Run the agent and interact with the MCP server on Cloud Run.
python 02_http_mcp_client.py
Repeat the queries below:
- List all tables
- How many users are in this database?
- List all usernames that begin with the letter 'a'
Back in the web interface for Cloud Run, click on the deployed service and then navigate to the logs. Find the requests associated with your queries.
- Take a screenshot of the request including the HTTP method and User-Agent used by the MCP client to access the MCP server
Clean up
Go back to the Cloud Run services interface, select the MCP server you deployed, and delete it.
